
 Lets start how to create Fire Text Effect in Photoshop. After complete this Graphic design education and classes, you can create Fire Effect, Text in Flaming, Fire Text Effect in Adobe Photoshop very easily. |
Application : Adobe Photoshop CS3
Difficulty : Beginner or New to Photoshop
Complication Time : 20 minutes only
Create Fire Text Effect in Adobe Photoshop | Learn Psd
Step 1 : Create A New Document
At first you need to take a new document for creating text fire effect.
Click File > new a window will come

Where you take
Width: 800 px
Height: 600 px
Resolution: 72 pixels/inch
Contents: white
Then you press OK
Step 2 : The New Document Fill With Black color
Click set foreground color icon on the tools box.

Set the color Black or Color code is: #000000 then click OK.
Then click paint bucket tool and click into this document.
Now the document color is Black.
Step 3 : Select Type Tool and Write
Now select Type Tool and select any
Font like: Times New Roman
Style: Bold
Size: 72pt or more
Color: white or color code: #FFFFFF
Now you type LEARN PSD or as your wise.

If you need to re-size your text. You can use Free Transform commend from Edit> Free Transform Or press keyboard shortcut (Ctrl+T) and re-size your text as your wise.
Then Press Enter.

Step 4 : Rasterize the Text
Select LEARN PSD Layer and click right button and click Rasterize Type.
Or
Go Layer > Rasterize > Type
Now create a duplicate layer from Layer > Duplicate Layer and press OK button.
Now you have to hide this duplicate layer. Click small eyeball icon for hide this layer.

Then click LEARN PSD layer because create the main fire effect on the original LEARN PSD layer.
Step 5 : Rotate The layer
Edit>Transform>Rotate 90° CW
Step 6 : Apply The wind Filter
Go to Filter > Stylize > Wind and select
Method: wind
Direction: From the Left
Click OK -as like image below.


Then select some Hue/Saturation Option.......
Hue: 42
Saturation: 100
Mark Colorize and press ok.
Again we apply Hue/Saturation so click Create new fill or adjustment layer>Hue/Saturation and select some Hue/Saturation Option.......
Hue: -15 and press ok.
Now your text effect is like this image.

Step 11 : Now Change Blend Mode and Turn on LEARN PSD copy layer.
Go to the blend mode option in the top left side on layer palette and change blend mode Normal to Overlay.

Now we will Turn on our LEARN PSD copy layer
 Step 12 : Add Gradient Overlay layer style in the LEARN PSD layer.
Now select LEARN PSD layer and Go Layer>Layer Style>Gradient Overlay and click on the Gradient color editor. When the Gradient Editor is open, Click on the Left side color marker. Then Click Color picker and select #ffcc33 color. Then press Ok.

And Click on the Right side color marker. Then Click Color picker and select #ff9933 color and press Ok.
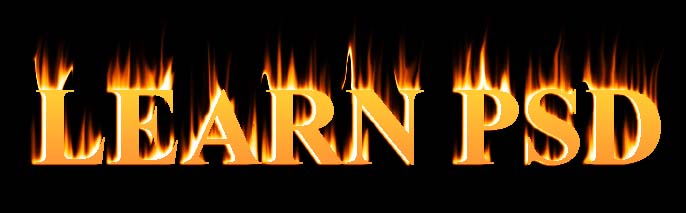
Now you can see your Create Fire Text Effect in Photoshop like this image.Now you see your final windows vista logo as like below image. Thanks for learn How to Create Fire Text Effect in Photoshop - Graphic design education.

Thanks for learning this tutorial How to Create Fire Text Effect in Photoshop - Graphic design education. If you have any advise please give us by comment.
Set the color Black or Color code is: #000000 then click OK.
Then click paint bucket tool
and click into this document.Now the document color is Black.
Step 3 : Select Type Tool and Write
Now select Type Tool and select any
Font like: Times New Roman
Style: Bold
Size: 72pt or more
Color: white or color code: #FFFFFF
Now you type LEARN PSD or as your wise.
If you need to re-size your text. You can use Free Transform commend from Edit> Free Transform Or press keyboard shortcut (Ctrl+T) and re-size your text as your wise.
Then Press Enter.
Step 4 : Rasterize the Text
Select LEARN PSD Layer and click right button and click Rasterize Type.
Or
Go Layer > Rasterize > Type
Now create a duplicate layer from Layer > Duplicate Layer and press OK button.
Now you have to hide this duplicate layer. Click small eyeball icon for hide this layer.
Then click LEARN PSD layer because create the main fire effect on the original LEARN PSD layer.
Step 5 : Rotate The layer
Edit>Transform>Rotate 90° CW
Step 6 : Apply The wind Filter
Go to Filter > Stylize > Wind and select
Method: wind
Direction: From the Left
Click OK -as like image below.
Re-Apply The wind Filter (do same work again)
Go to Filter > Stylize > Wind and select method- wind; Direction- From the Left; Click OK.
Re-Rotate The layer
Just go Edit > Transform > Rotate 90° CCW
Step 7 : Apply Gaussian Blur From Filter
Go Filter > Blur > Gaussian Blur a window will come then set the
Radius : 1.2
Press OK
Step 8 : Copy the Background Layer and Apply Merge Down.
At first click on the Background, Click right mouse button and select Duplicate Layer for create a copy background layer. Then you select LEARN PSD layer, Click right mouse button and select Merge Down.
Step 9 : Draw a Rectangular around the LEARN PSD text and apply Liquify effect.
Now you select Background copy Layer and draw a rectangular around the LEARN PSD text. Then you go Filter >Liquify. Now you select some liquify option....
Brush Size: 20 Or your wish.
Brush Density: 50
Brush Pressure: 100 and others things is also right. Now you can press ok. And press Ctrl+D (Keyboard shortcut) or Select>Deselect.
Step 10 : Now apply Hue/Saturation
At first you select Background copy Layer and click Create new fill or adjustment layer>Hue/Saturation.
Then select some Hue/Saturation Option.......
Hue: 42
Saturation: 100
Mark Colorize and press ok.
Again we apply Hue/Saturation so click Create new fill or adjustment layer>Hue/Saturation and select some Hue/Saturation Option.......
Hue: -15 and press ok.
Now your text effect is like this image.

Step 11 : Now Change Blend Mode and Turn on LEARN PSD copy layer.
Go to the blend mode option in the top left side on layer palette and change blend mode Normal to Overlay.
Now we will Turn on our LEARN PSD copy layer
Now select LEARN PSD layer and Go Layer>Layer Style>Gradient Overlay and click on the Gradient color editor. When the Gradient Editor is open, Click on the Left side color marker. Then Click Color picker and select #ffcc33 color. Then press Ok.

And Click on the Right side color marker. Then Click Color picker and select #ff9933 color and press Ok.
Now you can see your Create Fire Text Effect in Photoshop like this image.Now you see your final windows vista logo as like below image. Thanks for learn How to Create Fire Text Effect in Photoshop - Graphic design education.
Thanks for learning this tutorial How to Create Fire Text Effect in Photoshop - Graphic design education. If you have any advise please give us by comment.
Nice tutorial!You have explain it very well to understand easly and follow the steps..Thanks for this great sharing!! photography logo design
ReplyDelete