
 |
Application : Adobe Photoshop Cs
Difficulty : Beginner or New to Photoshop
Complication Time : 15 minute
Create a Lighting Effect With Photoshop- Learn Psd Tutorials
Step 1 : Take a new canvas or page

Width: 800 px
Height: 600 px
Resolution: 72 pixels/inch
Contents: white
After set all the values click OK.
Step 2 : Set Foreground and Background color

Click set foreground color icon on the tools box. Set the color code is FFFFFFthen click OK.
Now click set background color icon on the tools box. set the color code is 000000 then click OK
Step 3 : Apply Gradient Effect on the Page

Step 4 : Apply Clouds Effect on the Page
Go Filter>Render> Difference Clouds>ok
Now you will see the image like below.

Step 5 : Now Adjustment image
we need image adjustment for create lighting effect in our clouds effect. So Go Image>Adjustment>Invert.
Then Go Image>Adjustment>Level. Now adjust midtone input level and give its value 0.10 then click ok.

Go to Image>Adjustment>Hue/Saturation and set values following our below image.

Saturation- 45
Mark colorize and click ok.
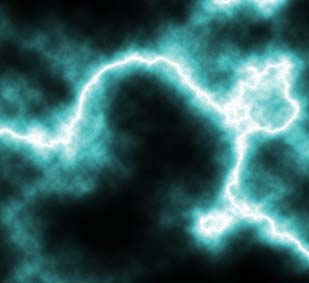
Final Output
Finally we can see Lighting Effect on the photoshop page.

No comments:
Post a Comment