This create a lighting Backgroun tutorials is very easy, who know this
work. But if you don't know this work, you can follow our tutorial step
by step and learn it minimum time in 15 minutes. In
this Photoshop tutorial, learn a fast and easy way
to using some Photoshop tools. Now we can start create a lighting Background.
Application : Adobe Photoshop Cs
Difficulty : Beginner or New to Photoshop
Complication Time : 15 minute
Step 1 : At first take a new canvas or page
At first we need a new page for create lighting Background. Go File>New set the page values as your wish. But you can follow our below image for set page values.
Width: 800 px
Height: 600 px
Resolution: 72 pixels/inch
Contents: white
After set all the values click OK.
Step 2 : Set Foreground and Background color
Step 4 : Apply wave effect from filter menu
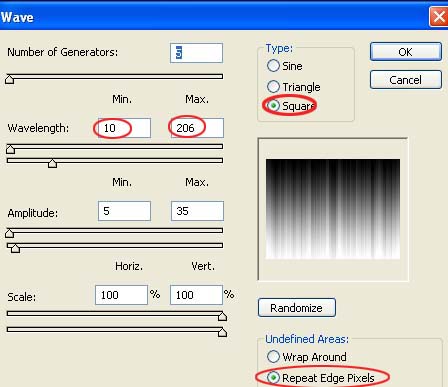
We have a new layer with gradient effect, now we apply wave effect. Go Filter>Distort>Wave set the values and follow our below image for set page values.
Number of Generators - 5
Wavelength - 10, 206
Select Type - Square
Select Undefined Areas - Repeat Edge Pixels
Step 5 : Apply Polar Coordinates effect from filter menu
Go Filter>Distort>polar Coordinates set the values and follow our below image for set page values.
Go Image>Adjustment>Hue/Saturation set the values and follow our below image for set page values.
Set Hue - 155
Saturation - 50
Select Colorize option and press ok.
Now you can see your desire Lighting Background.
Create a Lighting Background - Learn PSD Tutorials
Application : Adobe Photoshop Cs
Difficulty : Beginner or New to Photoshop
Complication Time : 15 minute
Step 1 : At first take a new canvas or page
At first we need a new page for create lighting Background. Go File>New set the page values as your wish. But you can follow our below image for set page values.
Width: 800 px
Height: 600 px
Resolution: 72 pixels/inch
Contents: white
After set all the values click OK.
Step 2 : Set Foreground and Background color
Click set foreground color icon on the tools box. Set the color code is FFFFFFthen click OK.
Now click set background color icon on the tools box. set the color code is 000000 then click OK
Step 3 : Apply Gradient Effect on the new layer
Now we need a new layer, Go to Layer>New>Layer>ok .Click Gradient tool and apply gradient effect on the new layer.
Number of Generators - 5
Wavelength - 10, 206
Select Type - Square
Select Undefined Areas - Repeat Edge Pixels
Step 5 : Apply Polar Coordinates effect from filter menu
Go Filter>Distort>polar Coordinates set the values and follow our below image for set page values.
Select Rectangular to polar and click ok.
Step 6 : Apply Lighting effect from filter menu
Go Filter>Render>Lighting Effect set the values and follow our below image for set page values.
Here all option are right, only change light type. Light type select - onmi and click ok. Now you can see a lighting effect on the image.
Step 6 : Apply Hue/Saturation for Color setting
Set Hue - 155
Saturation - 50
Select Colorize option and press ok.
Now you can see your desire Lighting Background.


I guess you could explain a little more about the gradient, which type of gradients to be applied here?
ReplyDelete